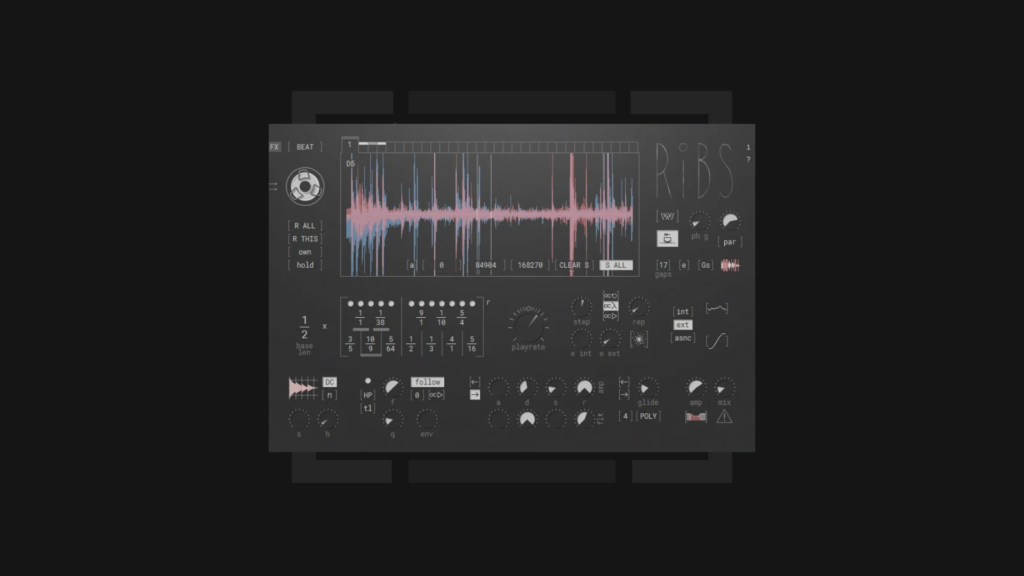
Is Ribs still a free granular VST in 2026? Yes. Ribs 1.2.4 by Hvoya Audio is still available as a free, optional-donation download for Windows and macOS. But it is now legacy software: the developer states that development has been suspended and warns that the older Mac builds will probably not run on newer versions of macOS. Ribs remains an unusually flexible sound-design instrument on a compatible system, not a modern plug-in with guaranteed future host support.
Ribs records incoming audio into short buffers, then rearranges the sound into grains. You can stretch a chord into an evolving texture, break a drum loop into unpredictable rhythm, scratch through a captured phrase or play pitched fragments using MIDI. It is both a granular effect and an experimental instrument, depending on how you route and trigger it.
There are two important limitations to understand before downloading: Ribs does not load WAV files directly into its buffers, and it cannot save the captured buffer audio for later recall. You feed it sound in real time, manipulate the result and record the processed output back into your DAW if you want to keep it. This guide covers the download, compatibility, FX versus MIDI modes, Ableton routing, creative techno examples, troubleshooting and sensible alternatives.
Verified 31 October 2026 against the developer’s official Ribs page, developer-hosted itch.io download, Plugin Boutique listing and published tutorials. We distinguish confirmed support from untested compatibility. Product details describe Ribs 1.2.4; they are not a promise that it will run in every current DAW.
Ribs granular VST: key facts
| Question | Answer |
|---|---|
| Developer | Hvoya Audio |
| Latest developer-hosted download checked | Ribs 1.2.4, packaged as a ZIP on itch.io |
| Price | Free, with an optional payment or donation |
| Formats | Legacy VST (VST2), Audio Unit (Mac) and standalone applications; no official VST3 build identified |
| Operating systems | Windows 32-/64-bit builds and older macOS builds; no official Linux release confirmed |
| Development | Suspended, according to the developer |
| Mac warning | Developer says Ribs will likely not run on newer macOS systems; native Apple Silicon support is not documented |
| Main modes | NOTES, SIMPLE and BEAT, with a separate FX operating switch |
| Sound source | Audio captured from the host input into buffers, rather than samples imported from a WAV browser |
| Important limitation | Buffer audio cannot be saved or reloaded; print your sound-design performance to audio |
| Official downloads | Hvoya Audio on itch.io; official product information |
Bottom line: Ribs is a good free choice when you already have a compatible Windows or older Mac setup and want detailed granular experimentation. If you depend on a modern Mac, need a native VST3-only instrument or expect the buffers to recall after reopening the project, do not build your workflow around an untested legacy plug-in. Hvoya’s own page specifically distinguishes the working Windows build from the uncertain status on recent macOS versions.
What does Ribs actually do?
Granular processing breaks recorded sound into tiny fragments called grains. By changing grain size, playback position, pitch, density, timing and filtering, a familiar recording can become a slowly moving drone, an abrasive burst or a new rhythmic sequence. The outcome depends not just on the original sound but on when it is captured and how the grain engine plays it back.
Ribs makes that process particularly direct by recording into a set of audio buffers while the DAW runs. The buffers are working areas, not an archive of imported samples. The plug-in can then play and manipulate parts of their content through multiple voices. MusicTech’s granular soundscape tutorial demonstrates this approach starting from a simple audio loop.

Buffers and voices are not the same as audio files
Descriptions of Ribs often refer to 32 voices or buffers. These are internal playback/capture resources, not 32 audio files you can drag into the instrument or 32 independent tracks stored in your project folder. The more voices and processing you use, the more complex the sound and the greater the potential load on the system.
The captured material is temporary. If you spend an hour producing a special texture, record it to an audio track before closing or resetting the plug-in. Hvoya’s itch.io page explicitly notes that Ribs cannot load WAVs or save its captured buffer content. Saving only the DAW project is therefore not a reliable way to preserve the precise processed performance.
Why it is useful for techno producers
Techno often relies on a small number of sounds developing over many bars. A percussion fill or synth chord can become a rhythmic idea or long atmosphere when processed granularly. Ribs lends itself to dub-style tails, hypnotic motion, mechanical pulses and unexpected transitions, especially when you treat its output as a sample that can be edited again.
Our techno music production guide covers the bigger arrangement and instrument choices. Here, the focus is what granular processing contributes to a track rather than which genre label belongs on the finished sound.
Where to download Ribs safely
The most direct and transparent source is the developer’s Ribs page on itch.io. Click Download Now, choose $0 if you want the free version, or enter an optional amount if you want to support Hvoya Audio. The listing includes Ribs_1.2.4.zip and a separate Ribs manual.pdf.
The official Hvoya product page remains useful for compatibility warnings and tutorial links. You can also find Ribs at Plugin Boutique (affiliate link), which lists the plug-in as free but requires an account. Affiliate disclosure: Underground Talent may receive a commission from qualifying purchases through that retailer link, at no extra cost to you. The developer download does not require buying anything.
Do not download a supposed “2026 VST3 update” from an unknown mirror, because Hvoya has not announced such a release. An older ZIP can still be legitimate when it comes from the developer. Free to download also does not automatically mean open source or unrestricted permission to redistribute altered copies of the software.
How to install Ribs on Windows and macOS
Windows: use a compatible VST host
- Download the developer-hosted ZIP and extract it to a normal folder.
- Choose the Windows VST build that matches your DAW’s architecture. Plugin Boutique identifies a 64-bit DLL named
Ribs_x64.dll; a separate 32-bit build is listed for older hosts. - Copy the plug-in DLL into a VST2 folder that your DAW actually scans. The folder varies with the host and your preferences;
C:\Program Files\VSTPluginsis only an example, not a universal requirement. - Rescan VST plug-ins or restart the DAW. Look for Ribs under the available instruments or effects according to your host’s classification.
- Try the simplest audio-FX test described below before investing time in a large session.
Ribs is a legacy VST plug-in, so a DAW that supports only VST3 will not necessarily recognise its DLL. Do not rename a DLL to .vst3 or assume it will become compatible. Where a bridge is available, compatibility and project recall still need testing. The developer describes the Windows version as functional but does not guarantee every current host.
Mac: check compatibility before installing
Original Ribs downloads included macOS VST, AU and standalone versions. However, Hvoya explicitly warns that newer macOS versions may not run the plug-in. There is no published claim of native Apple Silicon support or a maintained current macOS release, so the existence of an AU file does not establish compatibility with a modern Logic Pro or an Apple Silicon Mac.
If you have an older compatible setup, consult the included manual and install the AU or VST in the path your host scans. If macOS blocks the software, do not disable system-wide security controls just to force a legacy plug-in to load. For a professional project, test with a disposable session and preserve any working older setup.
The 2023 Bonedo review documents the original Windows VST2 and Mac VST/AU builds. That is historical format evidence, not a 2026 macOS compatibility certification. For broader host setup principles, see our VST installation guide.
Is there a Linux or VST3 release?
We found no official Linux release or VST3 build in Hvoya’s Ribs distribution. Some other Hvoya products use more modern formats; their specifications do not apply to Ribs 1.2.4. Confirm the requirements of this plug-in specifically rather than the developer’s catalogue in general.
First sound: use Ribs in FX mode
Start here if the plug-in opens but makes no sound. Ribs normally requires incoming audio and may expect MIDI note triggers in instrument-style operation. In the simpler FX mode, you can capture and manipulate a playing loop without first programming MIDI notes. The developer’s own ultrashort tutorial provides this starting sequence:
- Place Ribs on an audio or effect track and switch FX mode on using the control near the upper-left of the interface.
- Put an audio loop on that track or route an instrument’s output into it. Start with a steady synth chord, a short percussion loop or a field recording.
- Start the DAW’s transport and make sure the source actually reaches the Ribs input.
- Click the buffer tabs along the top of Ribs’ waveform area to choose or activate the material being captured.
- Listen for the processed output, then change playback and grain parameters gradually. Use the plug-in’s help/question-mark control for parameter descriptions.
- Record the processed output to another audio track before leaving the session.
If Ribs displays an empty buffer or an indication such as Refill Pending, it may be waiting for audio capture or the correct trigger. Check the FX switch, audio routing, running transport and buffer selection first. MusicTech’s practical walkthrough specifically notes that the plug-in can look silent when it is loaded in its default instrument-style mode with no notes or buffered audio.
Do not turn your monitors to maximum while troubleshooting. Granular settings can produce unexpectedly loud transients or resonant tones when you begin playback.
The main performance modes: NOTES, SIMPLE, BEAT and FX
NOTES: play the captured sound as an instrument
NOTES mode uses MIDI note information to play or pitch captured audio as a granular instrument. That makes it useful for a strange melody or evolving chord based on a vocal, ambience or one-shot sound. The key requirement is that your host deliver both the captured audio source and appropriate MIDI triggers. Some DAWs make that straightforward; others need separate routing or a plug-in wrapper.
Experiment with only a few voices first. More notes do not automatically sound better, and complex playback of a busy source can become a thick, unstable texture. Treat musical transposition and grain design as separate creative decisions.
SIMPLE: move through a buffer like a record
SIMPLE mode emphasises control of playback position through the captured waveform. Think of scratching or scanning through fragments of a record, not traditional beatmatching on a turntable. Small gestures can make stutters, reverse-feeling swells or tension before a drop. Record several passes and choose the most musical moments rather than expecting one perfect real-time performance.
BEAT: turn source fragments into new rhythms
BEAT mode connects grain playback with tempo-oriented subdivisions and ratios, allowing unusual rhythmic repeats and polyrhythmic effects. Feed it a relatively clear loop, reduce the complexity initially and listen for where the processed fragments sit against your main kick. A chaotic grain sequence can be a compelling fill but a poor constant backing rhythm.
FX switch: process incoming audio without a MIDI performance
The FX button determines how Ribs receives triggers in the simpler effect workflow. It is separate from the musical distinctions between NOTES, SIMPLE and BEAT. This is the key to avoiding a common misunderstanding: MIDI is not required simply to start capturing audio in FX mode. For hosts that cannot route audio and MIDI to the same plug-in instance, Hvoya says FX mode is the practical way to work.
Plugin Boutique’s feature listing summarises the three playback modes, polyphonic effects and optional formant-style processing. You can use the plug-in’s MIDI Learn functions to control suitable parameters, but exact host automation recording behaviour should be tested in your version.
How to route Ribs in Ableton Live
Ableton Live can route external audio to a plug-in track, but the exact setup depends on whether you are using Ribs as an effect or trying to play it with MIDI at the same time. The developer hosts a dedicated Ribs routing in Ableton Live tutorial showing the older workflow.
Easy route: process audio through FX mode
- Create an audio track containing a loop or an instrument that produces sound.
- Load Ribs on that track if your host exposes it as an effect, or route the source into a receiving track that hosts Ribs.
- Enable the FX switch, play the clip and verify that Ribs receives audio.
- Activate a buffer tab, shape the grains and record the receiving track’s output.
This avoids complex dual audio/MIDI routing when you are just learning the engine. If the plug-in is exposed only as an instrument in your host, use the appropriate track routing instead of looking for an effect insert that does not exist.
More advanced route: play MIDI while feeding audio
- Use a MIDI track hosting Ribs and a separate audio source track.
- Set the source track’s output or an appropriate send to the Ribs host track/input, following Live’s routing options for your version.
- Create or record MIDI notes on the instrument track to trigger voices in NOTES or another MIDI-controlled setup.
- Check the plug-in’s audio input configuration. Hvoya notes that some Ableton versions require choosing stereo channels 2–4 in Ribs’ multi-input channel configuration.
- Arm an audio track to record the processed result and test one bar before attempting a long performance.
Do not treat these steps as a current Live 12.3 compatibility guarantee. Ribs is an abandoned VST2 plug-in. The interface, route names and support for older plug-ins depend on the installed Live version, operating system and architecture. Follow Hvoya’s original video alongside the routing options visible in your own setup.
What about Cubase, Logic, FL Studio or REAPER?
Host-specific routing matters more than the genre you make. Hvoya warns that Cubase-style restrictions on combining audio and MIDI can make FX mode the workable option. In other hosts, use a sidechain, audio input bus, instrument routing or dedicated FX wrapper if supported. Do not assume a VST2 granular instrument will expose the same input pins or MIDI interface in every host.
For Logic Pro, the additional problem is that Ribs’ old AU may fail to load on newer macOS versions regardless of your routing. REAPER and other flexible hosts may provide more routing choices, but only testing a particular installation can establish compatibility.
Five practical techno sound-design ideas using Ribs
These are original production exercises, not claimed factory presets. Work at a comfortable listening level, use audio you have permission to process, and capture the finished result as a WAV file through your DAW. In each example, start with the plain audio, then introduce one granular parameter at a time.
1. Turn a dub chord into a drifting atmosphere
Create a sustained minor chord with a synthesizer and add a modest delay or reverb if the source needs character. Feed it into Ribs in FX mode, capture a stable fragment and use grain size and playback-position variation to create movement. Keep the processed result fairly quiet and let it develop over an eight- or sixteen-bar section. Render the texture, then high-pass or EQ it as needed so it does not compete with the kick and bass.
The appeal is the difference between a static sustained note and a living layer. A slow change in grain position or filter can be more hypnotic than several new instruments. If you want to use the same texture throughout a set, print several long variations and crossfade between them in the arrangement.
2. Rebuild a percussion loop as a mechanical stutter
Start with a dry two-bar hat-and-rim loop. Record it into Ribs and audition BEAT mode with simple divisions before exploring more complex ratios. Reduce the dry signal and find a few moments where the original rhythm splinters into a controlled polyrhythmic response. Print the best four-bar phrase and use it only at a transition or during a percussion breakdown.
Too much activity can blur the underlying groove. Keep the main kick separate and let the granular layer create tension around it. For more background on the rhythm and mixing decisions, our electronic music mixing guide explains how density and balance affect the track.
3. Create a strange vocal or robot texture
Record or legally source a short spoken phrase, breath or sustained vowel. Capture it in Ribs, then experiment with NOTES playback and the formant-style filter options described in the developer and Plugin Boutique feature listings. Play a few MIDI pitches, keeping the original phrase recognisable at first. Print a pass, process it further and chop the most interesting moments into an original rhythm.
Be deliberate with any source taken from another person’s recording. A free granular plug-in does not make samples legally cleared. Our techno remix guide explains when master and composition permissions may be needed before distributing an adaptation.
4. Build a transition from an ordinary field recording
Use your own recording of air, metallic rattles, a machine hum or another ambient sound. Capture a short section, alter grain playback speed and position, and record a slow sweep into a separate track. Reverse or automate the printed audio in your DAW if that produces a cleaner transition than live control. Bring it in before a breakdown and let the rhythm return after the texture peaks.
There is no need to push Ribs’ most extreme settings to make every sound interesting. Sometimes a slightly unstable background is all a hypnotic track needs. Print a few passes with different wet/dry balance so you have choices in the arrangement.
5. Turn one sound into a playable granular instrument
Feed a synth stab or a short vocal into a buffer, then use NOTES mode and a small number of voices to play a restrained melodic figure. Compare the result with a normal sampler: the granular version may sound rougher, less stable or more animated. Use pitch changes musically and record each pass while the captured audio is still available.
When the part is ready, export the audio as your own stem and remove or mute the live Ribs instance. This avoids relying on undocumented buffer recall or repeated manual triggering every time you reopen a session.
A 128 BPM granular-techno arrangement example
Here is a practical way to turn one Ribs experiment into a track section. The tempo and timings are illustrative; they are not Ribs presets or performance specifications. At 128 BPM in 4/4, 16 bars last 30 seconds and 32 bars last one minute.
| Bars | Main event | Granular role |
|---|---|---|
| 1–16 | Kick and tight percussion establish the groove | Keep Ribs muted or use only a faint background texture |
| 17–32 | Introduce bass or a simple synth figure | Bring in a printed, slowly evolving chord layer |
| 33–48 | Add rhythmic tension | Use short printed BEAT-mode stutters as call-and-response fills |
| 49–64 | Strip back for a breakdown | Feature a longer printed grain cloud or altered vocal |
| 65–80 | Full groove returns | Reduce or filter the granular layer to make room for kick and bass |
| 81–96 | Transition or outro | Let an atmospheric print decay or introduce one final scratch fragment |
Because Ribs’ internal buffers are short and volatile, do not assume it will hold a complete 16-bar musical phrase. Capture smaller sound fragments, record the processing externally and arrange the printed audio over the longer song structure. That workflow gives you the creative unpredictability of Ribs without tying the whole project to a plug-in that may not recall the original buffer contents.
If you need drum one-shots to build around the granular layers, our Free Techno Tools V2 pack guide is a separate resource. Check the pack’s licence and distribution conditions before publishing any derivative sounds.
Why recording Ribs’ output is essential
Most modern DAWs make it easy to render an instrument or effect. With Ribs, this is not merely a way to save CPU: it is how you preserve the sound. The developer clearly states that captured audio cannot be saved or reloaded, and the itch.io listing does not offer ordinary WAV import into the granular buffers.
- Create a dedicated audio track to receive the processed output, or use the DAW’s bounce/resample function.
- Check levels before recording, especially if using resonant filters, short grains or high feedback-like textures.
- Record a little more than the section you need, including any tail.
- Rename the new file according to the source and treatment, for example
granular-dub-chord-take-03.wav. - Save the raw processed recording alongside your DAW session and any permitted source audio.
- Reopen a copy of the project and verify that the printed stem plays without Ribs.
If you only save automation, MIDI and plug-in state, the instrument may return with empty audio buffers. Reconstructing a chaotic sound-design take from knob positions can be difficult even when the plug-in itself still opens. Print first, then make arrangement decisions with the audio file.
Ribs limitations worth knowing before you install
- Development is suspended. The developer has not promised future bug fixes, VST3 support or updates for modern macOS.
- Newer Mac compatibility is uncertain. Some legacy AU/VST components may fail on current operating systems or Apple Silicon machines.
- No buffer import or persistence. You cannot drop a WAV straight into Ribs’ buffers or save their captured audio for later, unlike conventional sample-based granular tools.
- Routing can be demanding. The difference between audio capture and MIDI performance is easy to misunderstand, especially in hosts that separate instrument and effect workflows.
- Unpredictability is part of the instrument. Intricate granular textures can change with capture timing and playback gestures; record what you like rather than expecting exact repeatability.
- It is not an all-purpose mastering plug-in. Ribs excels at creative manipulation, but it is not a replacement for corrective EQ, mix balance, audio restoration or a stable modern sample library.
For these reasons, we recommend Ribs primarily for experimental sessions and printed sound design, especially on Windows or an already verified older system. If you need guaranteed plug-in recall for an ongoing commercial project, make the rendered audio—not a live Ribs instance—the dependable part of the production.
Ribs troubleshooting: common problems and fixes
Ribs loads but there is no sound
Confirm the track has incoming audio, the DAW transport is running and the Ribs FX switch is active. Click an appropriate buffer tab to initiate capture. If you are intentionally using instrument mode, check MIDI routing and note triggers instead. A blank buffer is usually a workflow problem, not evidence that the download is broken.
My DAW doesn’t find Ribs after installation
Make sure you copied the VST2 DLL into a folder the DAW scans and selected the correct 32-/64-bit version. Ribs is not advertised as VST3, so a VST3-only scan or unsupported host may not find it. Rescan, restart and test with a new blank project. On macOS, the host may be unable to load the older binary at all.
Ableton Live receives the audio but the buffers remain empty
Check the Ribs FX mode, source routing and its multi-input configuration. Hvoya specifically mentions choosing stereo channels 2–4 under the plug-in’s multi-input setup in some Live routing situations. If you are using NOTES mode, the instrument must also receive MIDI; for a first test, try FX mode instead.
Ribs works in one DAW but not another
Hosts vary in whether they allow simultaneous audio and MIDI input to an instrument. Hvoya says some hosts, including Cubase in its original routing notes, work properly with Ribs only when FX mode is enabled. This is not a guarantee that every Cubase release behaves identically; use the documented effect workflow and test the exact host version.
My Mac blocks or crashes when loading it
The developer’s compatibility warning takes precedence over old download-directory claims. New versions of macOS, Apple Silicon and host security requirements can prevent the legacy plug-in from working. Do not disable important machine security or alter production projects to force an unsupported plug-in into service. Use a compatible older setup or another maintained granular tool.
The sound disappears after reopening the project
Ribs does not save captured buffer content. Recover the source audio, feed it back into the plug-in and recreate the effect if possible—but exact results may vary. For future work, record the processed output to a WAV stem while the session is still active.
Why does Ribs produce harsh noise or unexpected peaks?
Extremely short grain selections, extreme playhead positions, resonant filter settings or aggressive modulation can make experimental granular audio surprisingly loud. Lower monitoring levels and back off one parameter at a time. Do not treat clipping or uncomfortable sound as part of a required setup procedure.
Underground Talent verdict: a remarkable free legacy experiment
Ribs remains worth discovering if you enjoy transforming ordinary audio into something unrecognisable. Its combination of performance modes, real-time capture, buffer control and MIDI interaction gives it a character different from a simple “granular reverb” preset. You can create tones, strange rhythms and textures from a loop you already have, then turn the result into your own musical material.
But it deserves an accurate recommendation in 2026: Ribs is free, genuinely available and no longer actively maintained. It is not a universal modern Mac plug-in, and its buffers are not a portable saved sample library. On a compatible system, the best approach is to experiment boldly and record the sounds that work.
Get Ribs: official developer download (free or optional donation). For release details and the explicit macOS warning, use Hvoya Audio’s product page.
Ribs VST: frequently asked questions
Is Ribs still free in 2026?
Yes. Hvoya Audio’s itch.io download lets you choose a $0 payment or a voluntary amount. The developer-hosted package identified when this article was updated was Ribs 1.2.4.
Is Ribs still being developed?
No. Hvoya Audio explicitly states that development has been suspended. The existing Windows build is described as functional, but updates for newer hosts or operating systems should not be assumed.
Does Ribs work on macOS and Apple Silicon?
Older Mac VST and AU versions were published, but the developer warns that newer macOS versions may not run them. We found no claim of native Apple Silicon compatibility. Test it on a non-critical project if you have a compatible older Mac environment.
Is there a Ribs VST3 version?
The developer and current distribution listings identify legacy VST and Mac AU formats, not a maintained Ribs VST3 build. Do not confuse Ribs with newer Hvoya products that use VST3.
Can Ribs load WAV files?
No. Hvoya’s own download notes say Ribs does not directly load WAV files into its buffers. Feed audio from your DAW or live input into the plug-in and capture it while the transport runs.
Can Ribs save its audio buffers?
No. The current developer listing says captured buffer content cannot be saved and reloaded. Record the processed output to an audio track or file if you want to retain the result.
Why is Ribs silent when I first open it?
It may be waiting for audio capture or MIDI triggering. For the quickest start, turn on FX mode, route a playing audio source into Ribs and activate a buffer tab. The developer’s short tutorial demonstrates this exact sequence.
What is the difference between NOTES, SIMPLE and BEAT?
NOTES provides pitched, note-driven granular performance, SIMPLE focuses on scanning/scratching the buffer, and BEAT uses rhythmic divisions for tempo-related repeats and polyrhythmic effects. FX is a separate operation mode used for processing incoming audio without an instrument-style MIDI performance.
Can I use Ribs in Ableton Live?
It was used in older Live versions and Hvoya has an official routing tutorial. Current compatibility depends on the particular operating system, Live release, VST2 support and audio/MIDI routing. For a basic test, use FX mode and follow the developer’s multi-input channel guidance if the audio is not reaching Ribs.
Is Ribs suitable for professional techno tracks?
Yes as a source of printed creative audio when it runs reliably. For reproducible projects, record the resulting pads, glitches and atmospheres to stems rather than expecting the unsupported plug-in to retain buffer contents indefinitely.
Sources and further reading
- Hvoya Audio: Ribs official product page — suspended development and newer macOS compatibility warning.
- Hvoya Audio: developer download and ultra-short tutorial — free/name-your-price 1.2.4, formats, FX workflow and lack of WAV import/buffer persistence.
- Plugin Boutique: Ribs feature and system requirements — NOTES, SIMPLE, BEAT, FX, MIDI and legacy distribution.
- Bonedo: Hvoya Audio Ribs Test (18 May 2023) — independent overview of legacy formats, buffer design and learning curve.
- MusicTech: Making evolving granular soundscapes with Ribs — practical FX-first tutorial and processing method.
- Hvoya Audio: New features in Ribs 1.2; original Ribs tutorial; Ableton routing tutorial.
Use Ribs as an instrument for generating audio, then treat the printed sound as the reliable asset. That one habit makes an experimental legacy plug-in much easier to use in a serious production workflow.